

Wind Mitigation Inspection in Southwest Florida
A wind mitigation inspection documents the parts of your home that help it hold together in a storm: how the roof deck is fastened, how the roof is tied to the walls, the roof’s shape, and how the windows and doors are protected. Your insurance company uses the completed report to determine which windstorm discounts may apply. Those discounts depend on your carrier and your policy.
At Groff Inspections, the report reflects what can be verified at your home, not what a product looks like or what someone remembers being installed. David photographs every finding, explains anything that can’t be confirmed, and emails the completed form the same day.
What Is a Wind Mitigation Inspection?
It’s an inspection recorded on Florida’s uniform mitigation verification form, OIR-B1-1802. The form has a set list of questions about construction features that resist wind and water intrusion. For each one, the inspector records the category that can be supported by what’s visible at the home and by the records you provide.
Two principles shape every report:
- Verification beats appearance. A roof or window that looks compliant still needs evidence, such as a permit, a product label, or an approval number.
- The weakest condition counts. For roof deck attachment, roof-to-wall connections, and opening protection, the form follows the weakest applicable condition found, not the strongest.
The Nine Sections of Florida's Wind Mitigation Form
Here’s what each section of the form evaluates, in the order it appears, with the details that most often decide the result. For worked examples of how answers are chosen and what to do when a section comes back weaker than you expected, see our wind mitigation report explained section by section guide.
1. Building code
This section identifies the building code in effect when the home’s original building permit was applied for. Construction year and permit records help establish the right category.
A newer roof or upgraded windows may improve other sections of the report, but those improvements don’t change the building code the home was originally built under.
2. Wind region
Your home’s location determines its wind region, using the design wind speed the form specifies. This describes the wind exposure associated with the property’s location. It is not a rating of the wind speed your individual home is guaranteed to withstand.
3. Roof slope
Roof slope describes how steep the roof is. A 6:12 slope, for example, rises six inches for every twelve inches of horizontal distance.
For single-family homes, the report distinguishes roofs where at least two-thirds of the main roof area is 6:12 or steeper from roofs that don’t meet that threshold. Homes with several roof slopes may need more than one section measured.
4. Roof covering
Roof covering is the outside roofing material, such as shingles, tile, metal, or membrane roofing. David identifies each covering type and reviews installation dates, permits, and product approvals to support its classification.
A roof’s appearance alone doesn’t establish compliance. Keep your roofing permits, installation records, and product information available, especially when the home has more than one roofing material.
5. Roof deck attachment
The roof deck is the plywood, oriented strand board (OSB), lumber, or other structural surface beneath the roofing. How it’s attached to the trusses or rafters helps it resist the upward forces wind puts on a roof.
David evaluates deck thickness, fastener type and length, nail spacing, and framing spacing. The report reflects the weakest applicable attachment identified during the inspection.
For roofing contractors
For plywood or OSB decking, the strongest conventional nail-based classification on the form is Category C. It requires:
- Decking at least 7/16 inch thick
- Trusses or rafters spaced no more than 24 inches apart
- 8d common nails spaced no more than 6 inches apart in the field, meaning the intermediate supports beneath each sheet
A 6-inch nailing pattern at both panel edges and field supports is a clear target when you’re planning deck attachment improvements. Spacing alone isn’t enough, though. The decking, nail specifications, framing spacing, and installation all have to meet the requirements, and you should follow the approved fastening schedule for the project, which may require closer spacing in certain locations. A reroof is the best chance to improve and document the deck attachment before it’s covered, and clear photos plus permit records help support an accurate classification.
6. Roof-to-wall attachment
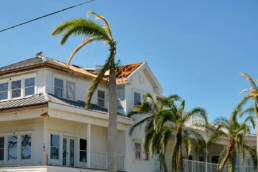
Roof-to-wall connections help keep the roof structure attached to the walls when wind creates upward force. These connections may be angled nails (toenails), metal clips, single wraps, double wraps, or documented structural connection systems.
David evaluates each connection’s configuration, how it’s fastened, how it attaches to the wall, any gaps or blocking, and visible corrosion. The report follows the weakest applicable connection, not the strongest connector found in the attic. In the field, that means a metal connector can still fall short of a clip. A connector with too few nails, one sitting more than half an inch from the truss, or one with excessive corrosion won’t qualify, even though it looks like a clip at a glance.
For contractors: manufacturer installation specifications matter
The form requires every retrofit connector and structural fastener used to qualify for the clip, single-wrap, or double-wrap categories to follow the manufacturer’s installation specifications and meet the required allowable uplift capacity. A connector’s published capacity depends on the installation conditions behind that rating: the specified fastener type, size, quantity, and placement, plus the required wood penetration, anchorage, and blocking where applicable. A minimum nail count on the inspection form should not be treated as a complete installation schedule.
For the documented performance-based options, the minimum allowable wind uplift capacities are:
- Clip category: 386 pounds
- Single-wrap category: 535 pounds
- Double-wrap category: 891 pounds
These options require documentation specific to the property. A product brochure alone doesn’t establish that the installed assembly achieves its advertised rating. Keep the connector model information, installation instructions, capacity information, permits, and photos of the completed connections before they’re concealed.
7. Roof geometry
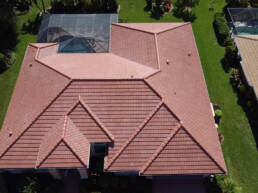
Roof geometry describes the roof’s shape. A hip roof generally slopes down on all sides. A gable roof has vertical triangular ends.
To qualify for the hip roof category, non-hip features can’t exceed 10% of the total roof-system perimeter. This is a perimeter calculation, not a percentage of roof surface area. A roof that looks mostly hip may still fall into the “other roof” category after it’s measured. Certain porch and carport roofs over unenclosed spaces are excluded under the form’s rules, and the separate flat roof category applies to buildings with five or more units that meet its slope and area requirements.
8. Sealed roof deck / secondary water resistance (SWR)
Secondary water resistance is an extra layer of protection against water getting into the home if the outer roof covering is lost in a storm. The report identifies whether a qualifying system can be verified and which type was installed.
For roofing contractors: document the system in the permit packet
Documentation in the roofing permit or permit packet makes a substantial difference. Include the product name, manufacturer, Florida Product Approval or Miami-Dade approval number where applicable, and supporting specifications showing that the system meets the form’s requirements. The records should also describe how and where the product was installed.
A product approval identifies a product and its approved uses, but it doesn’t, by itself, show that a qualifying SWR system was installed throughout the applicable roof area. Detailed permit records, an itemized contractor statement, and photos taken before concealment help the inspector make a better-supported judgment. A general note such as “underlayment installed” may not be enough.
Good documentation helps homeowners receive credit for improvements that can be verified. When the installed system can’t be adequately established, the report may need to record it as unknown or undetermined.
9. Opening protection
This section evaluates protection for windows, exterior doors, sliding glass doors, skylights, and garage doors. Product labels, approval records, installation details, condition, and available documentation all help establish the protection level.
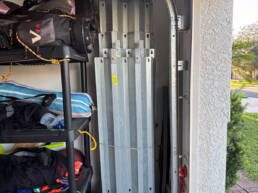
Wind-pressure resistance and impact resistance are different. A pressure-rated product isn’t automatically rated to withstand flying debris. Shutters or panels have to be identifiable and installed with the right attachment system, so panels stored in the garage don’t establish qualifying protection on their own.
The form evaluates the weakest protection level among the openings that contain glass, and separately records protection for openings without glass. One unprotected, unverified, or damaged opening can change the classification for the whole home.
Why a Form-Accurate Report Matters
Every answer on the form affects what your insurance company can apply to the wind portion of your policy. A report that overstates a feature can be questioned later. A report that understates one leaves out work you paid for. The goal is the most complete report the home and its records can support.
When something can’t be verified, the form may need to record it as unknown or undetermined. David will tell you exactly which section that is and which document or photo would change it, so you know whether it’s worth tracking down.
How to Prepare for Your Inspection
Provide clear attic access, and gather what you can before the visit:
- Roofing permits and the roof’s installation date
- Reroof photos, especially any taken before the new covering went on
- Records for any roof-to-wall connector retrofit
- Window and door product approvals
- Shutter documentation, including the mounting hardware
For homeowners, Realtors, insurance agents, and contractors, the most useful approach is the same: install improvements correctly, document them before they’re concealed, and verify the completed work. Groff Inspections turns that evidence into a clear report your insurance company can review.
Insurance deadline coming up? Call (941) 299-1688 or email info@groffinspections.com and we’ll get your wind mitigation on the schedule, usually within one to five days.
What Happens During the Visit
- Exterior. David documents roof shape, covering, slope, and every glazed and unglazed opening, including labels on windows and garage doors.
- Attic. He inspects the roof deck, fasteners, and roof-to-wall connections, and photographs the conditions that set each category.
- Records review. Permits and product information you provide are matched against what’s installed.
- Same-day form. The completed form and photos are emailed to you the same day, and to your insurance agent if you tell us to send it.
Most homeowners in older homes also need a 4-point at the same time. If that’s you, book them together on our 4-point and wind mitigation inspection together page.
Why Homeowners and Agents Choose Groff for Wind Mitigation
- Built by someone who built houses. David spent 10 years in construction before becoming a licensed Florida home inspector (HI16718), so he knows how roofs and connections are actually assembled.
- Photos that explain themselves. Every category is backed by labeled photos, which helps if your insurer has questions.
- Straight answers about what can’t be verified. You’ll know which records would change the result.
- Same-day delivery and confidential reporting. The form goes to you and anyone you authorize.
Roofers and contractors can see how to document their work for the form on our documentation guide for roofers and contractors. Insurance agents can find report delivery details on our resources for insurance agents page.
Wind Mitigation FAQ
On its own, it takes far less time than a full home inspection. Time on site depends mostly on attic access and how many roof sections need to be measured. The completed form is emailed the same day.
That’s your carrier’s decision. The report documents the features that can be verified, and your insurance company decides which credits apply under its own rules. Your insurance agent is the best person to ask how your report affects your policy.
Often, yes. A reroof can change the roof covering section, and if the deck was renailed and documented, the roof deck section too. Ask your roofer for the permit and photos before the new covering goes on.
Generally not. Wind mitigations are most often requested on existing homes. If you’re buying new construction, the inspections that matter most happen during the build.
Yes, with your permission. The report is confidential and goes only to you unless you tell us who else should receive it.
Schedule Your Wind Mitigation
An accurate form starts with a careful look at the attic and good records. Gather what you have, clear the attic hatch, and we’ll handle the rest. Before storm season, it’s also worth reading our hurricane season home inspection checklist.
Schedule a wind mitigation inspection by calling (941) 299-1688 or emailing info@groffinspections.com.